Acrylic nameplates are ubiquitous, found in retail stores, restaurants, and offices. Ready to confidently hang your acrylic nameplate? A safe and professional installation is just a few simple steps away. Anyone can create an eye-catching space display.
Tip: Start with the right tools and a clear plan. This will make the whole process smooth and stress-free.
Key Takeaways
- Choose the best hanging method. Consider the weight of the nameplate and the wall material. Brackets are suitable for heavier nameplates, while adhesive strips are better suited for lighter ones.
- Prepare your wall before hanging the nameplate. Thoroughly clean the wall. This helps the adhesive strip adhere better and ensures the nameplate is secure and stable.
- Follow your chosen installation method. This will make your nameplate look neat and attractive and help avoid mistakes during installation.
Best Ways to Hang Acrylic Name Signs
There are many good options when people want to hang acrylic nameplates. The most common installation methods include using brackets, tape, Velcro, and clips. Each method works best in different situations. Let’s look at the principles behind each installation method and their respective advantages.
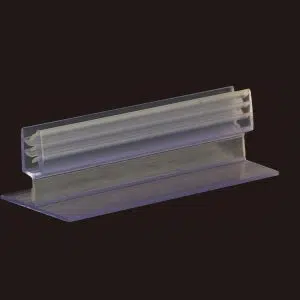
Standoffs Method
Bracket mounting gives acrylic signs a modern, floating effect. This method uses metal or plastic spacers to separate the sign from the wall. Bracket mounting is commonly seen in offices, lobbies, or any location where a professional look is required.
Suitable Scenarios:
Bracket mounting is best suited for medium to heavy acrylic signs. They work best on solid surfaces such as wood, brick, or concrete. For drywall walls, wall anchors are needed for additional support.
Required Tools and Materials:
- Bracket mounting accessories
- Electric drill and drill bits
- Screwdriver
- Wall anchors (for drywall or masonry walls)
- Level and measuring tape
A solid surface is key for bracket mounting. On brick or concrete walls, cement anchors provide better stability. On wooden surfaces, pilot holes can be drilled first, and then the brackets can be screwed directly in.
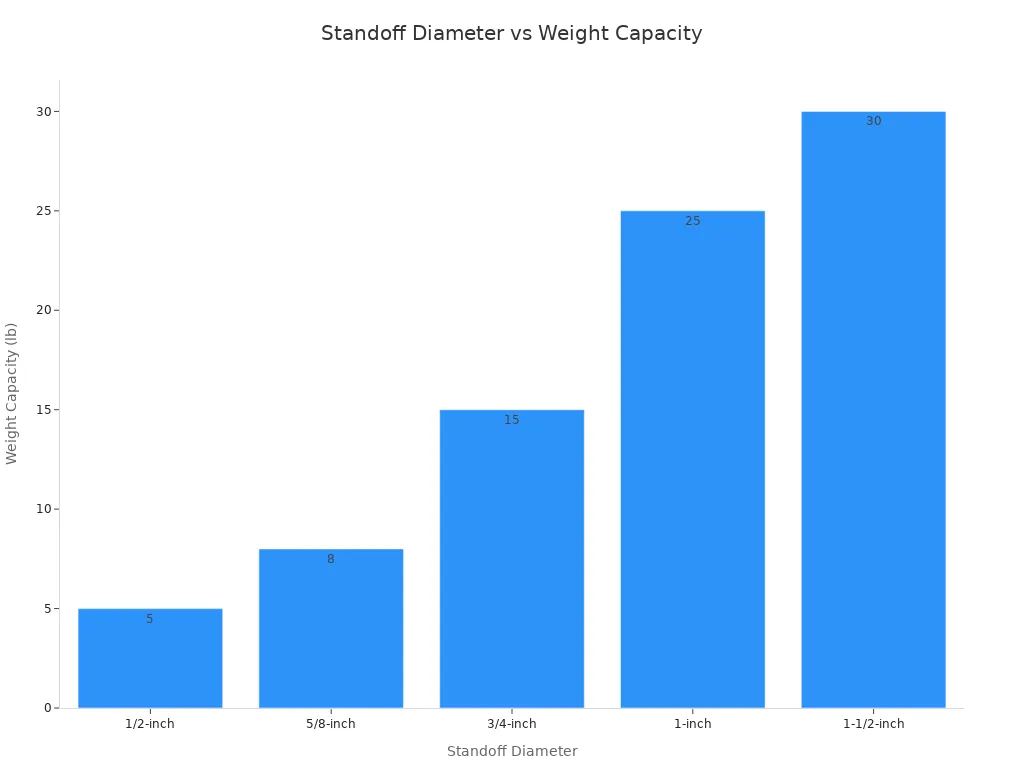
| Standoff Diameter | Weight Capacity per Standoff |
|---|---|
| 1/2-inch | 5 lb |
| 5/8-inch | 8 lb |
| 3/4-inch | 15 lb |
| 1-inch | 25 lb |
| 1-1/2-inch | 30 lb |
Tip: Always measure and mark the wall surface before drilling. This helps keep the sign level and prevents errors.
Adhesive Strips and Tapes
Adhesive mounting is a common method for lightweight acrylic nameplates. People like this method because it’s quick and easy, requiring no tools. Simply peel off the backing, stick, and press the nameplate onto a clean, smooth wall surface.
Adhesive mounting is best suited for small or lightweight nameplates. It works well on smooth surfaces such as glass, tile, or painted drywall. This method is frequently used in homes, classrooms, or offices where a convenient installation solution is needed.
Tools and Materials Needed:
- Adhesive strips or double-sided tape
- Alcohol or cleaning agent (for surface preparation)
- Soft cloth
Adhesive mounting is best suited for flat, untextured surfaces. It is not suitable for rough or uneven wall surfaces. For heavier signs, alternative installation methods are recommended.
Note: For best results, clean the wall surface first. This helps adhesive installations last longer.
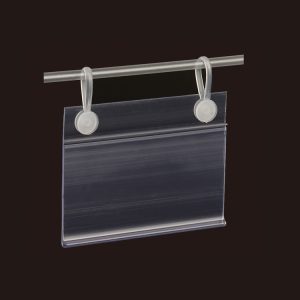
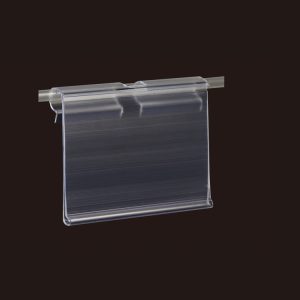
Velcro and Clip-on Installation Options
Velcro and Clip-on Installationmethods offer users greater flexibility. These options allow users to easily remove or reposition signs. Hook & Loop uses hook-and-loop adhesive strips, while clip-on installation uses small clips that hold the sign to the wall.
Suitable Scenarios:
Velcro is ideal for medium-weight signs that need to be moved frequently. Clip-on installation facilitates quick sign replacement and maintains a neat appearance. Both are suitable for retail stores, event venues, or locations where signs are frequently changed.
Tools and Materials Needed:
- Velcro strips or clips
- Surface cleaner
- Scissors (for cutting hook and loop fasteners)
Hook and loop fasteners are best suited for smooth, clean surfaces. They may not be able to support heavier signs. Clips are easy to install but have lower load-bearing capacity.
Tip: For signs that need to be removed for cleaning or replacement, hook and loop fasteners are recommended.
Pros and Cons of Each Method
Choosing the appropriate acrylic sign hanging method depends on the weight of the sign, the wall material, and the frequency of sign movement. Here is an overview of the advantages and disadvantages of various installation methods:
| Mounting Method | Advantages | Disadvantages |
|---|---|---|
| Standoffs | High load-bearing capacity, suitable for various surfaces, professional appearance | Requires drilling, installation time-consuming |
| Adhesive Strips | No drilling required, easy to reposition, quick to use | Only suitable for light-duty signs, not suitable for rough surfaces |
| Velcro | Easy to remove and move, simple to use | Not suitable for heavy-duty signs, requires double-sided adhesion |
| Snapfix | Simple appearance, quick installation | Limited load-bearing capacity, not suitable for all surfaces |
People often choose adhesive strips to install light-duty signs. For medium-weight signs, hook and loop or snapfix installation works well. Heavy-duty signs require brackets or reinforcing hooks. Some people even use stainless steel chains or slings to install special signs.
Remember: The best installation method depends on the size, weight, and hanging location of the sign. Always check the wall type and follow the safe hanging procedures for acrylic signs.
How to Hang Acrylic Signs: Step-by-Step Guide
Ready? This installation guide will walk you through all the steps, from preparing your tools to ensuring your sign looks great. Whether you choose adhesive or bracket installation, these step-by-step instructions will allow you to hang your acrylic sign with ease and confidence.
Tools and Materials Checklist
Before you begin, make sure all your materials are ready. Here are the tools typically needed for various installation methods:
- Bracket Installation:
- Electric drill and drill bits
- Level or ruler
- Pencil
- Bracket accessories (bolts, nuts, expansion bolts)
- Pre-drilled acrylic signboard
- Nylon wall anchors and screws
- Adhesive Installation:
- Adhesive strips or double-sided tape
- Alcohol or mild cleaner
- Soft cloth
- Ladder or stool (for higher positions)
- For Velcro or Snapfix:
- Velcro strips or Snapfix clips
- Scissors
- Cleaner
Using professional tools such as a CNC engraving machine or laser cutter can help create smooth, precise edges on acrylic signs. These tools will make the sign look more professional and fit perfectly.
Tip: Prepare all tools before you begin. This will save time and help avoid mistakes.
Surface Preparation Tips
A clean, smooth wall surface helps the sign adhere firmly. Here are surface preparation methods:
- Wipe the wall surface with a soft cloth dampened with a mild detergent to remove dust, dirt, or grease.
- Check the wall type. Dryboard, brick, tile, and wood walls require different installation accessories.
- Ensure the surface is dry before installation.
- If using adhesive, maintain indoor humidity between 40% and 60%, which helps the adhesive bond better.
- Avoid installing the sign in excessively hot or cold environments. Extreme temperatures weaken the adhesive’s tack.
Note: A clean surface helps extend the life of adhesive installations and prevents the sign from falling off.
Installation Steps for Each Method
Let’s look at the steps for each installation method in detail. This installation guide covers both bracket installation and adhesive installation, making it easy for anyone to hang acrylic signs.
Bracket Installation
- Prepare all materials: bracket, acrylic sign, electric drill, level, pencil, expansion bolts, and screws.
- Affix the sign to the wall. Mark the locations for drilling holes with a pencil.
- Check the alignment again with a level.
- Drill holes at the marked locations.
- Insert nylon expansion bolts into the holes.
- Secure the bracket base to the wall with screws.
- Place the acrylic sign on the bracket. Secure with nuts.
- Check that the sign is level and secure.
Adhesive Installation
- Clean the wall with alcohol or a mild detergent. Allow it to dry.
- Mark the sign’s position with a level.
- Peel off the backing of the adhesive strip or tape.
- Apply the adhesive strip or tape to the back of the sign.
- Press the sign firmly against the wall. Hold for 30 seconds.
- Step back a few steps and check that the sign is level.
- For letters or multiple parts, use masking tape to secure until the glue hardens.
- Once the glue has hardened, remove all tape.
Velcro or Clips
- Clean the wall and the back of the sign.
- Tear the Velcro strip to the appropriate length, or prepare the clips.
- Attach one side of the Velcro to the wall and the other side to the sign.
- Press the sign onto the wall. Adjust the position as needed.
- If using clips, fasten the clips onto the sign before attaching it to the wall.
Tip: Always follow the manufacturer’s instructions for each product.
Safety and Professional Finish Tips
Safety first when learning how to hang acrylic signs. Here are some tips to ensure a secure and aesthetically pleasing installation:
- Measure and mark before drilling holes or attaching anything to the wall.
- Pre-drill holes to prevent cracking of the wall and acrylic sheet.
- Use wall anchors for added support, especially on drywall or masonry walls.
- Wear safety glasses when drilling.
- After installation, gently press the sign to test its stability.
- Wipe fingerprints or dust off the sign with a soft cloth for a professional and aesthetically pleasing finish.
Properly installed signage is not only aesthetically pleasing but also ensures everyone’s safety.
Maintenance and Care
Acrylic signage requires only a little maintenance to maintain its appearance. Here are some ways to keep your signage looking new:
| Cleaning Method | Description |
|---|---|
| Use Soft Microfiber Cloths | To gently wipe away dust and debris, avoiding scratching the acrylic surface. |
| Avoid using harsh chemicals | Do not use ammonia-based cleaners. Use mild detergent and water. |
| Recommended Cleaning Solution | Mix mild detergent with warm water, or use a commercially available acrylic cleaner. |
- Inspect the signage every few months to ensure it is secure.
- Regular inspections help detect and resolve small problems before they escalate.
- If the signage feels loose, reapply adhesive or tighten the brackets.
Regular cleaning and inspection help extend the lifespan of acrylic signage and maintain its shine.
With this installation guide and step-by-step instructions, anyone can safely hang acrylic nameplates and make them last.
Choosing how to hang acrylic nameplates depends on several factors:
| Factor | Description |
|---|---|
| Tag Weight | Heavier nameplates require a bracket. Lighter nameplates can use adhesive or Velcro. |
| Wall type | Adhesive is suitable for smooth walls. Brackets are suitable for textured walls. |
| Location | Outdoor nameplates require sturdy fasteners. Indoor nameplates can use adhesive. |
People should avoid the following mistakes:
- Using the wrong hanging method or the wrong wall surface
- Choosing hardware that is not suitable for temporary nameplates
- Not checking the nameplate after hanging
If you follow each step and use the checklist, you can display your nameplates safely and professionally every time.
FAQ
How much weight can adhesive tape support?
Most adhesive tapes can support up to 2 pounds (approximately 0.9 kg). Heavier acrylic signs require brackets or hooks for secure installation.
Can the Velcro on acrylic signs be reused?
Yes, Velcro can be reused multiple times. They make it easy to move or replace signs without damaging the wall surface.
What is the best way to clean acrylic signs?
Use a soft microfiber cloth and mild soap. Avoid using harsh chemicals. This will keep the acrylic surface clear and prevent scratches.